2008 - MX-5 - Body and Accessories
CONVERTIBLE TOP DISASSEMBLY/ASSEMBLY
1. Disassemble in the order indicated in the table.
2. To remove the striker, remove the following parts:a. Female wedge (See CONVERTIBLE TOP DISASSEMBLY/ASSEMBLY.)b. Map light (See MAP LIGHT REMOVAL/INSTALLATION.)c. A-pillar trim (See A-PILLAR TRIM REMOVAL/INSTALLATION.)d. Front header trim (See FRONT HEADER TRIM REMOVAL/INSTALLATION.)
3. Assemble in the reverse order of disassembly.

|
1 |
Top lock lever cover |
|
2 |
Top lock cover |
|
3 |
Top lock |
|
4 |
Male wedge cover |
|
5 |
Male wedge |
|
6 |
Set plate |
|
7 |
Slider |
|
8 |
Weatherstrip |
|
9 |
Retainer (See Retainer Disassembly Note.) (See Retainer Assembly Note.) |
|
10 |
Top fabric (See Top Fabric Disassembly Note.) (See Top Fabric Assembly Note.) |
|
11 |
Rain rail (See Rain Rail Disassembly Note.) (See Rain Rail Assembly Note.) |
|
12 |
Spring A (See Spring A Disassembly Note.) |
|
13 |
Spring B (See Spring B Disassembly Note.) |
|
14 |
Striker |
|
15 |
Connector |
|
16 |
Female wedge |
|
17 |
Cab-side weatherstrip |
Retainer Disassembly Note
1. Mark around the retainer installation screws with paint before removing them.

Top Fabric Disassembly Note
1. Remove the top fabric from the front bow retainer.
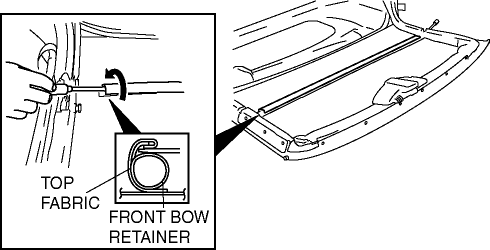
2. Pull out the top fabric from the front header.

3. Remove the covers.

4. Remove the cable installation rivet using a drill.

5. Remove the cables from the cable guide.
6. Remove the band installation rivet using a drill.

7. Remove the nut, then remove the cable end bracket.

Rain Rail Disassembly Note
1. Remove the rivets from the top fabric using a drill.
Spring A Disassembly Note
1. Remove the bolt.

2. Remove the spacers, spring and collars from the link.
Spring B Disassembly Note
1. Remove the bolt.
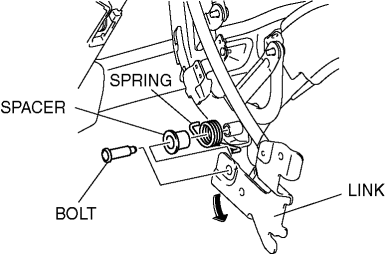
2. Pull the link in the direction of the arrow to remove the spacer and spring.
Rain Rail Assembly Note
1. Degrease the rain rail using white gasoline.
2. Install the insulation tape to the rivet installation hole of the rain rail.
3. Secure the top fabric and rain rail with the rivet.

4. Flatten the stem using hammer.
Top Fabric Assembly Note
1. Place the link onto the top fabric.
2. Align the link with the set plate installation hole of the top fabric, and install the top fabric to the front header.

3. Thread the cable into the cable guide.

4. Set the aluminum rivet to the riveter, and then secure the cable to the link with the rivet.
5. Install the covers.
6. Install the top fabric to the front bow.

7. Secure the top fabric to the front bow retainer using a rubber hammer.

8. Set the aluminum rivet to the riveter, and then secure the band to the link with the rivet.
9. Install the cable end bracket.
Retainer Assembly Note
1. Install the retainers to the link, aligning the retainer marks with the retainer installation screws.
< Previous Next >
© 2009 Mazda North American Operations, U.S.A.