2008 - MX-5 - Body and Accessories
FRONT HEADER TRIM REMOVAL/INSTALLATION
Removal
CAUTION:
Do not twist or drop the front header trim, otherwise the vanity mirror could be damaged.
1. Remove the battery cover.
2. Disconnect the negative battery cable. (See BATTERY REMOVAL/INSTALLATION [LF].)
3. Remove the female wedge. (See CONVERTIBLE TOP DISASSEMBLY/ASSEMBLY.)
4. Remove the map light. (See MAP LIGHT REMOVAL/INSTALLATION.)
5. Remove the A-pillar trim. (See A-PILLAR TRIM REMOVAL/INSTALLATION.)
6. Remove the screws.
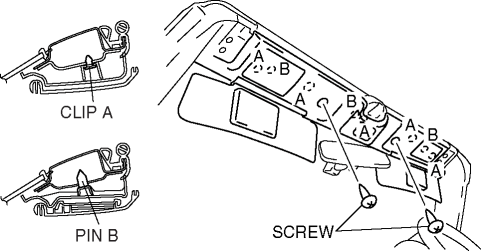
7. Pull the front header trim toward you, then disengage the clips A and pin B from the body.
8. Remove the front header trim.
Installation
CAUTION:
Do not twist or drop the front header trim, otherwise the vanity mirror could be damaged.
If the front header trim is installed with the sunvisor pulled up, the vanity mirror could be damaged. Always install the front header trim with the sunvisor pulled down.
1. Install the pin A and clip B.

2. Pull down the sunvisor on the right, then install pin C and clips D.
3. Pull down the sunvisor on the left, then install pin E and clips F.
4. Install the screw.
5. Install the A-pillar trim. (See A-PILLAR TRIM REMOVAL/INSTALLATION.)
6. Install the map light. (See MAP LIGHT REMOVAL/INSTALLATION.)
7. Install the female wedge. (See CONVERTIBLE TOP DISASSEMBLY/ASSEMBLY.)
8. Connect the negative battery cable. (See BATTERY REMOVAL/INSTALLATION [LF].)
9. Install the battery cover.
< Previous Next >
© 2009 Mazda North American Operations, U.S.A.