2008 - MX-5 - Engine
FUEL PUMP UNIT REMOVAL/INSTALLATION [LF]
WARNING:
Fuel is very flammable liquid. If fuel spills or leaks from the pressurized fuel system, it will cause serious injury or death and facility breakage. Fuel can also irritate skin and eyes. To prevent this, always complete the “Fuel Line Safety Procedure”, while referring to “BEFORE SERVICE PRECAUTION”.
Fuel is very flammable liquid. If fuel spills or leaks from the pressurized fuel system, it will cause serious injury or death and facility breakage. Fuel can also irritate skin and eyes. To prevent this, before performing the fuel pump unit removal/installation, always complete the “Fuel Leak Inspection After Fuel Pump Unit Installation”.
1. Follow “BEFORE SERVICE PRECAUTION” before performing any work operations to prevent fuel from spilling from the fuel system. (See BEFORE SERVICE PRECAUTION [LF].)
2. Remove the battery cover.
3. Disconnect the negative battery cable. (See BATTERY REMOVAL/INSTALLATION [LF].)
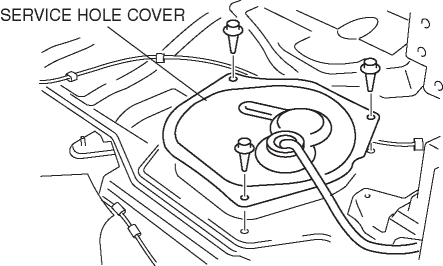
4. Perform the following procedure to remove the service hole cover.a. To remove the back trim, remove the following parts:i. Console (See CONSOLE REMOVAL/INSTALLATION.)ii. Quarter trim (See QUARTER TRIM REMOVAL/INSTALLATION.)iii. Scuff plate (SCUFF PLATE REMOVAL/INSTALLATION.)iv. Tire house trim (See TIRE HOUSE TRIM REMOVAL/INSTALLATION.)v. Aeroboard (See AEROBOARD REMOVAL/INSTALLATION.)vi. Front seat back bar garnish (See SEAT BACK BAR GARNISH REMOVAL/INSTALLATION.)b. Remove the back trim. (See BACK TRIM REMOVAL/INSTALLATION.)c. Remove the service hole cover.
5. Disconnect the quick release connector from the fuel pump unit. (See QUICK RELEASE CONNECTOR REMOVAL/INSTALLATION [LF].)
6. Disconnect the fuel pump unit connector.
7. Remove in the order indicated in the table.

1
Plate
2
Packing
3
Fuel pump unit
8. Install in the reverse order of removal.
9. Complete the “AFTER SERVICE PRECAUTION”. (See AFTER SERVICE PRECAUTION [LF].)
Fuel Leakage Inspection After Pump Unit Installation
1. Before installing the fuel tank, verify that there is no leakage when a pressure of 5.9 kPa {44 mmHg, 1.7 inHg} is applied to the fuel tank.
2. Install the fuel tank. (See FUEL TANK REMOVAL/INSTALLATION [LF].)
3. Drive the vehicle starting from a standstill and brake suddenly five to six times at a low speed.
4. Stop the vehicle and verify from outside the vehicle that there is no fuel leakage around the fuel pump unit.
< Previous Next >
© 2012 Mazda North American Operations, U.S.A.