2008 - MX-5 - Engine
CYLINDER HEAD GASKET REPLACEMENT [LF]
WARNING:
Fuel vapor is hazardous. It can very easily ignite, causing serious injury and damage. Always keep sparks and flames away from fuel.
Fuel line spills and leakage are dangerous. Fuel can ignite and cause serious injuries or death and damage. Fuel can also irritate skin and eyes. To prevent this, always complete the “Fuel Line Safety Procedure”. (See BEFORE SERVICE PRECAUTION [LF].)
1. Perform “Fuel Line Safety Procedures“. Leave the fuel pump relay removed. (See BEFORE SERVICE PRECAUTION [LF].)
2. Remove the battery and battery tray. (See BATTERY REMOVAL/INSTALLATION [LF].)
3. Drain the engine coolant. (See ENGINE COOLANT REPLACEMENT [LF].)
4. Remove the front suspension tower bar (joint, right side, left side). (See FRONT SUSPENSION TOWER BAR REMOVAL/INSTALLATION.)
5. Remove the air cleaner. (See INTAKE-AIR SYSTEM REMOVAL/INSTALLATION [LF].)
6. Remove the dynamic chamber. (See INTAKE-AIR SYSTEM REMOVAL/INSTALLATION [LF].)
7. Remove the ignition coil. (See IGNITION COIL REMOVAL/INSTALLATION [LF].)
8. Remove the drive belt. (See TIMING CHAIN REMOVAL/INSTALLATION [LF].)
9. Remove the CKP sensor. (See CRANKSHAFT POSITION (CKP) SENSOR REMOVAL/INSTALLATION [LF].)
10. Remove the P/S oil pump with the oil hose still connected and position the P/S oil pump so that it is out of the way. (See POWER STEERING OIL PUMP REMOVAL/INSTALLATION.)
11. Remove the timing chain. (See TIMING CHAIN REMOVAL/INSTALLATION [LF].)
12. Remove the wiper arm. (See WIPER ARM AND BLADE REMOVAL/INSTALLATION.)
13. Remove the cowl grille. (See COWL GRILLE REMOVAL/INSTALLATION.)
14. Remove the side cowl grille. (See SIDE COWL GRILLE REMOVAL/INSTALLATION.)
15. Remove the service hole cover. (See EGR VALVE REMOVAL/INSTALLATION [LF].)
16. Disconnect the generator, but do not remove it from the vehicle. Fix the generator using a rope to prevent it from falling. (See GENERATOR REMOVAL/INSTALLATION [LF].)
17. Remove the exhaust manifold. (See EXHAUST SYSTEM REMOVAL/INSTALLATION [LF].)
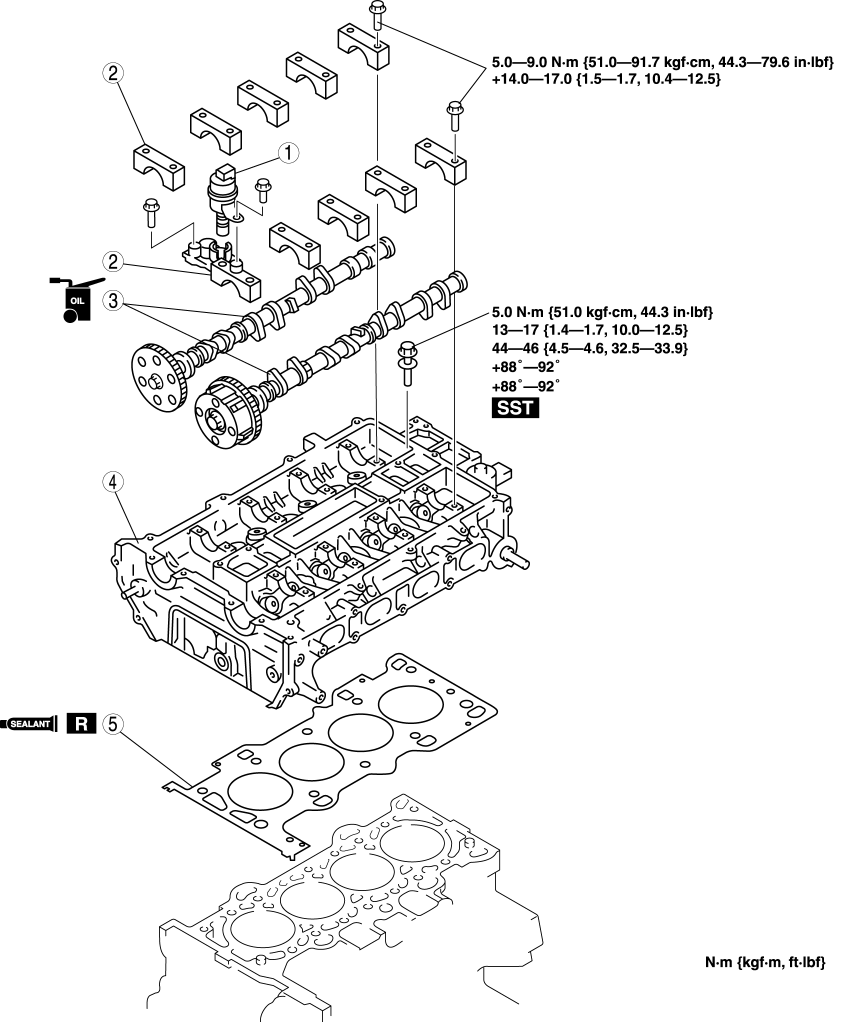
18. Remove in the order indicated in the table.
19. Install in the reverse order of removal.
20. Inspect the compression. (See COMPRESSION INSPECTION [LF].)
21. Start the engine and:
Inspect for the engine coolant leakage.
Verify the ignition timing, idle speed and idle mixture. (See ENGINE TUNE-UP [LF].)
|
1 |
OCV (With variable valve timing mechanism.) |
|
2 |
Camshaft cap |
|
3 |
Camshaft (See Camshaft Removal Note.) (See Camshaft Installation Note.) |
|
4 |
Cylinder head (See Cylinder Head Removal Note.) |
|
5 |
Cylinder head gasket |
Camshaft Removal Note
NOTE:
The cylinder head and the camshaft caps are numbered to make sure they are reassembled in their original position. Do not mix the caps.
1. Loosen the camshaft cap bolts in several passes in the order shown.

Cylinder Head Removal Note
1. Loosen the cylinder head bolts in two or three steps in the order shown.

Cylinder Head Gasket Installation Note
1. Apply silicone sealant to the areas shown in the figure.CAUTION:
Install the cylinder head gasket and cylinder head before the applied silicone sealant starts to harden.

Thickness
4—7 mm {0.16—0.27 in}
2. Install the cylinder block with a new cylinder head gasket.
3. Apply silicone sealant to the areas shown in the figure.

Thickness
4—7 mm {0.16—0.27 in}
4. Install the cylinder head referring to the Cylinder Head Installation Note.
Cylinder Head Installation Note
1. Measure the length of each cylinder head bolt.
Replace any that exceed the maximum length.
Cylinder Head Bolt Length L
145.2—145.8 mm {5.72—5.74 in}
Cylinder Head Bolt Maximum
146.5 mm {5.77 in}

2. Tighten the cylinder head bolts in the order shown with the following 5 steps using the SST (49 D032 316).a. Tighten to 5.0 N·m {51.0 kgf·cm, 44.3 in·lbf}b. Tighten 13—17 N·m {1.4—1.7 kgf·m, 10.0—12.5 ft·lbf}c. Tighten 44—46N·m {4.5—4.6 kgf·m, 32.5—33.9 ft·lbf}d. Tighten 88°—92°e. Tighten 88°—92°

Camshaft Installation Note
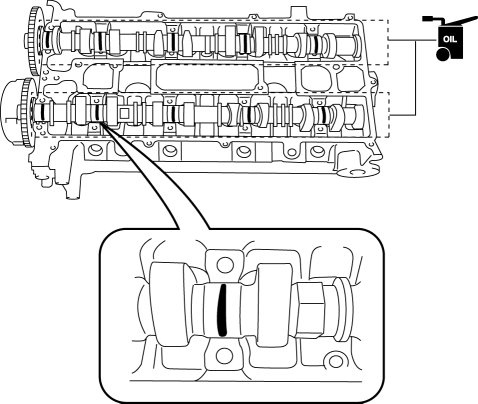
1. Apply the gear oil (SAE No.90 or equivalent) to each journal of the cylinder head as shown in the figure.

2. Set the cam position of No.1 cylinder at the top dead center (TDC) and install the camshaft.
3. Apply the gear oil (SAE No.90 or equivalent) to each journal of the camshaft as shown in the figure.
4. Temporarily tighten the camshaft bearing caps evenly in two or three steps.
5. Tighten the camshaft cap bolts in the order shown with the following two steps.a. Tighten to 5.0—9.0 N·m {51.0—91.7 kgf·cm, 44.3—79.6 in·lbf}b. Tighten to 14.0—17.0 N·m {1.5—1.7 kgf·m, 10.4—12.5 ft·lbf}

< Previous Next >