2008 - MX-5 - Transmission/Transaxle
TRANSMISSION REMOVAL/INSTALLATION [M15M-D]
1. Remove the battery cover. (See BATTERY REMOVAL/INSTALLATION[LF].)
2. Disconnect the negative battery cable. (See BATTERY REMOVAL/INSTALLATION[LF].)
3. Loosen the starter installation bolts only enough that the starter is loose, but not removed.
4. Remove in the order indicated in the table.
5. Install in the reverse order of removal.
6. Perform the "INSPECTION AFTER TRANSMISSION INSTALLATION", and verify that there is no malfunction.

|
1 |
Shift lever knob |
|
2 |
Console |
|
3 |
Shift insulator component (outer) |
|
4 |
Shift insulator component (inner) |
|
5 |
Shift lever component |
|
6 |
Member bracket |
|
7 |
Tunnel member |
|
8 |
Catalytic converter, middle pipe |
|
9 |
Clutch release cylinder |
|
10 |
Power plant frame |
|
11 |
Hanger bracket |
|
12 |
Propeller shaft (See Propeller Shaft Removal Note.) |
|
13 |
Back-up light switch connector |
|
14 |
Neutral switch connector |
|
15 |
Vehicle speed sensor connector |
|
16 |
Wire |
|
17 |
Transmission installation bolt |
|
18 |
Transmission (See Transmission Removal Note.) |
|
19 |
Stopper |
|
20 |
Bolt |
CAUTION:
When removing/installing the transmission, be sure not to move the engine up and down more than necessary to prevent part interference with the engine.
Power Plant Frame Removal Note
1. Support the transmission using a transmission jack.

2. Remove the power plant frame.
Propeller Shaft Removal Note
1. Install the SST to the main shaft.

2. Insert a slab of wood behind the rear differential, and remove the propeller shaft.

Transmission Removal Note
WARNING:
Remove the transmission carefully, holding it steady. If the transmission falls it could be damaged or cause injury.
1. Support the transmission securely using a transmission jack.

2. Remove the transmission installation bolts.
3. Remove the transmission.
Transmission Installation Note
1. Shift to any gear position.
2. Install the SST to the main shaft.
WARNING:
Install the transmission carefully, holding it steady. If the transmission falls it could be damaged or cause injury.
3. Place the transmission on the transmission jack and raise it.
NOTE:
Slowly rotate the SST to engage the clutch with the main drive gear spline, and install the transmission.
4. Install the transmission.
5. Tighten the transmission installation bolts and nuts.Tightening torque

37—52 N·m {3.8—5.3 kgf·m, 28—38 ft·lbf}
Power Plant Frame Installation Note
1. Support the transmission using a transmission jack.
2. Install the power plant frame.
3. Temporarily tighten the nuts 1, 2, 3 in order shown in the figure.
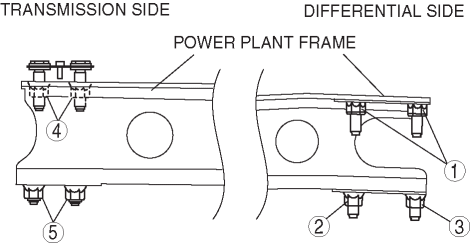
4. Tighten nut 2 until the power plant frame is seated in the rear differential.
5. Temporarily tighten the nuts 4, 5 in order shown in the figure.
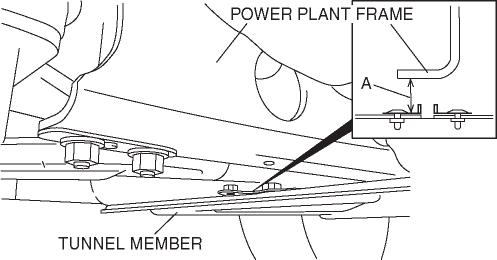
6. Install the catalytic converter, middle pipe and tunnel member.
7. Raise the front end of the power plant frame (transmission side) or the transmission with the transmission jack, and adjust dimension A to 26.7—34.7 mm {1.06—1.36 in} (lower surface of power plant frame-upper surface of the tunnel member) as shown in the figure.
8. Tighten the nuts on the rear differential side in the order shown in the figure.Tightening torque

126.0—154.0 N·m
{12.9—15.7 kgf·m, 93.0—113 ft·lbf}
9. Tighten the nuts on the transmission side in the order shown in the figure.Tightening torque

126.0—154.0 N·m
{12.9—15.7 kgf·m, 93.0—113 ft·lbf}
10. Verify that dimension A is within the specification with the transmission jack removed.Standard dimension A
If it is not within the specification, adjust dimension A again.
26.7—34.7 mm {1.06—1.36 in}
Shift Lever Component Installation Note
NOTE:
If the extension housing has been removed or the transmission has been disassembled and inspected, always add the specified type and amount of transmission oil.
1. Add the specified type and amount of oil to the shift control case.

Shift control case specified oil grade
API Service GL-4 or GL-5
Shift control case specified oil viscosity
SAE 75W-90
Shift control case capacity (approx. quantity)
290—330 ml {290—330 cc, 17.69—20.13 cu in}
2. Apply grease to the areas of the shift lever component as shown in the figure.

3. Align the shift lever component notch with the shift control case pin and install the shift lever component.
< Previous Next >